The Friendship Star Mug Mat is an easy Hand Quilting project that can be fully completed in a few hours without using a sewing machine. I used a pattern template from an old book Patching Things Up, by Jan Halgrimson which was published in the early 90’s for this project. This book shows quilt pattern templates in 3-4 block sizes. As directed in the book, I added a ¼ inch seam to the template and selected the 8 -inch block. Find a block pattern that is 8 to 9 -inches finished.
Free patterns are available in old books and magazines. Many wonderful quilting books can be found in local thrift stores and at yard sales. Look for the free box! Accurately cutting the block pieces is crucial so if you are not trained correctly in rotary cutting methods, using the paper templates to start can save your block in the end.
Worrying about the length of stitches as a beginner quilter, can hamper progress. Do not worry about stitching perfectly but try to keep the hand sewing stitches small and back tack at the end. Make sure the seam is ¼ inch consistently and hide the knots (pull through to the inside) or leave them on the outside for this project. The finished project will have a soft rustic look. Keep in mind that this is a little quilt, not a trampoline, so hand sewing is sturdy enough.
Yardage:
Use scraps of 100 % cotton quilting fabric, fat quarters or yardage cuts 1/3 to 1/2 yards for each color.
Select a Friendship Star block pattern with a finished size that is 8 – 9 inches.
Yardage:
Use scraps of 100 % cotton quilting fabric, fat quarters or yardage cuts 1/3 to 1/2 yards for each color.
Triangle blocks - cut 4 prints and 4 solids
Select a Friendship Star block pattern with a finished size that is 8 – 9 inches.
- Make the templates being sure to label each block and marking the directional arrow that indicates the straight grain.
- Place the templates on the fabric following the grainline and trace the pattern blocks, layering no more than four pieces of fabric at once. This will ensure cutting is accurate.
- Pin inside the traced areas near the cutting line before cutting with scissors. This will hold the fabric pieces together. Cut out the pieces directly on the marking line.
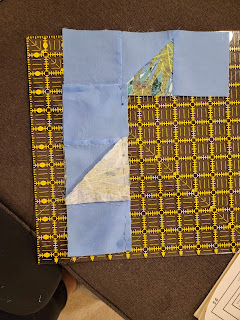
- Lay out the block pieces to match the block pattern and take a picture once you know it is in the correct orientation. This will help with correct piecing later.
- Pin the block pieces together using straight pins and then hand stitch completing one panel at a time, pressing seams as you go. Press light colors seams towards dark color seams.
- After completing 3 panels, lay them out in the block pattern and check it against the picture that was taken earlier, to be sure it is stitched in the correct orientation. Pin the panels together and sew them using ¼ each seam allowance.
- Press the block. It should measure the finished dimensions plus ½ inch (8 ½ for an 8-inch finished block).
- Carefully trim edges, making sure you do not cut into the stitching. In quilting, this is referred to as, “squaring up the block.”
- Cut out the backing fabric and the batting to fit the size of the finished block.
- Layer the block; right side of backing facing right side of top and the batting at the bottom. Pin around the block through all layers. Trim batting to fit top and bottom layers.


- Layer 1 – Top - Backing fabric, right side facing down
- Layer 2 – Middle - Quilt Block top facing up
- Layer 3 – Bottom - Batting
13. Carefully turn the quilt inside out and lightly press the edges. Slipstitch the 2-inch-long opening, turning in the ¼ inch seam.


15. Long Stitch quilt 1 inch in from the edge around the entire mat, using ½ to ¾ inch long


Wow! Your instructions are very detailed and clear . Hand stitching makes it more vintage.
ReplyDeleteThe pictures makes it more helpful for beginners. Sometimes I cut my squares diagonal and then stitch them to make the Half square triangles.
Yes. I sometimes used that method.
Delete